22-Day Spring Cleaning Routine Week 1: The Bedroom
Deep Clean Your Bedroom
Let your 22-Day Spring Cleaning Routine Begin!
For Week 1, we’re starting off with an area of your house that often gets neglected when it comes to the heavy-duty cleaning…the bedroom! Your bedroom is supposed to be your sanctuary, dedicated to relaxing at the end of the day and letting your worries drift away. But, in most cases, our rooms are quickly reduced to a storage area where piles of clothing and a hodgepodge of household items have overstayed their welcome—a place where you dare not let anyone enter.
If we’re being honest, we often put off cleaning our bedrooms because we tend to focus on the rest of the house as it’s what our guests actually see! So what’s the harm in putting off these duties until a rainy day? As it turns out, procrastinating on those cleaning tasks may have more serious consequences than simply creating more work for your future self. A messy bedroom can add to everyday stress, cause anxiety, and even interfere with your quality of sleep. So it’s time to give your bedroom some love too! Create the peaceful bedroom you deserve with our step-by-step room cleaning checklist. In just a few steps, you’ll be crawling into clean sheets and will have a neat and tidy space primed for sweet dreams.
The Bedroom Breakdown:
- Clean Bedding
- Clean & Flip Mattress
- Clean Windows & Walls
- Clean Floors & Nightstands
- Clean & Organize Closet
- Vacuum Air-ducts and Vents
- Dust Lights & Change Bulbs
- Clean Under The Bed
- Clean Light Switches
Day 1: Bedding & Mattress
You should be cleaning your sheets and pillow cases weekly, but what about the other items on your bed? It’s time to start fresh! Strip EVERYTHING off your bed, we’re talking pillows, sheets, comforters, mattress covers…EVERYTHING! Using Boulder Clean’s Laundry Detergent and Fabric Softener, wash everything that you pulled off your bed, it may take 2-4 loads. Be sure to read all laundry care labels on your items to avoid ruined bedding!
Let’s face it, our mattresses are probably pretty gross. They’re faced with our bodies on a nightly basis, sometimes we eat in bed, sometimes we’re sick— overtime our mattresses can get a little smelly and even uncomfortable. While you’re powering the multiple loads of bedding, take a few moments to address your mattress.
First things first, sprinkle it with a little baking soda! This will help clear up any unpleasant odors that have started to build, and will ultimately leave your mattress smelling fresh. Let the baking soda sit for a few minutes, then slowly and carefully (so you don’t blow baking soda all over the room), vacuum your mattress. Once you’ve vacuumed up all of the baking soda, give your mattress a flip and a spin if necessary. Once you flip your mattress, apply baking soda again and vacuum it clean.
Once your bedding is freshly laundered, make your bed immediately. DO NOT, we repeat DO NOT let your laundry sit for several hours or days, especially in the washer or dryer. Letting it sit in the wash, will allow mildew to start building, which means you’ll have to clean it again. Plus, when the time comes and you’re ready for bed, you’ll be much happier if you can crawl into fresh sheets instead of having spend the time making your bed when all you want to do is sleep!
To keep your and mattress looking and feeling fresh, remember to regularly wash everything, and flip or rotate your mattress when it starts getting uncomfortable.
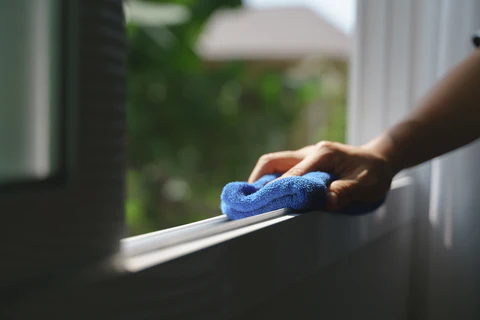
Day 2: Walls & Windows
Give your bedroom walls and windows a thorough cleaning! Dust windows, window sills, and walls, including any art, making sure you leave no cobweb untouched!
If your windows have screens give them a once over with the vacuum. If you noticed your window screens are super dusty or filled with debris, you can always remove them and let them soak in soapy water for 30 minutes, before rinsing and returning to the window. Using a glass cleaner, spray and wipe down your windows, be sure to hit any cranks, handles or locks.
After you’ve dusted your walls and art, using a disinfectant, all purpose cleaner or a little soap and water tackle any stains or lingering dirt and fingerprints. While you’re at it, give your baseboards, any doors, and light switches a quick wipe down. If you notice any dim or flickering lights, take a few minutes to change your bulbs out.
If you have curtains in your room take the time to run them through the wash. Or, if you have plastic blinds, make sure to give them a good dusting and wipe down with a little all purpose cleaner.
Your room should already be starting to feel lighter, brighter and cleaner!
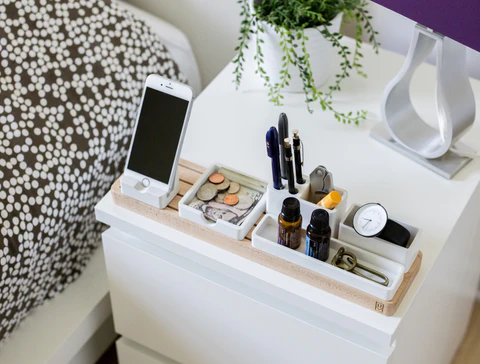
Day 3: Floors & Nightstand
Dust your nightstand, and using an all purpose cleaner wipe it (and any items living on it) thoroughly. Take any dishes or cups to the kitchen, remove any trash. If you find your nightstand is cluttered, take an extra 10 minutes to declutter, put your books away, throw away that broken phone charger and organize your remotes and cables. To keep your nightstand organized and ultimately cleaner for a longer period of time, we recommend limiting it to only a few items, think tv remotes, a book or journal, and a photo or plant.
Now pick everything up off the floor, put your dirty laundry in the hamper, your shoes in the closet (we’ll tackle that tomorrow!), every single knickknack and doodad in your room should have a home that isn’t the floor. Once your floor is clear it’s time to clean! Depending on your floors, give them a good vacuum or sweep. Make sure to hit every nook and cranny so you don’t miss any of those hiding dust bunnies! If you have wood floors or another hard surface, use Boulder Clean’s Wood Floor Cleaner or Multi-Surface Floor Cleaner to mop your floors, so they’re sparkling clean!
If you have carpeted floors, check for any stains you might be able to remove with a little soap and water or carpet stain remover. If your carpets are extra-soiled, consider renting a carpet cleaner to truly give them the deepest clean possible.
Floors and Nightstand…check! Just one more day and you’ll be done with Week 1 of your Spring Cleaning Checklist!

Day 4: Closet
Naturally we saved the worst for last… cleaning your closet can be a tough job and unfortunately there’s no way around it! The best way to attack your closet, is to pick one section—be it a shelf, a drawer or a group of hangers—and pull everything out. Sort through your clothes and be brutally honest, if you haven’t worn it in months or don’t like it— donate it! If it’s full of holes or coffee stains— trash it. If you find you’ve pulled out something you don’t always use, like heavy winter coats, maybe keep one or two handy, but put the rest in storage. After you’ve sorted your clothes, vacuum out your drawer or wipe down the shelf to make sure there are no lingering combs, dirt or dust. Neatly put your clothes back, and move on to the next section. By the time you’ve completed each section you should see a closet full of only clean items you regularly wear.
After you’ve tackled your clothes (and don’t forget your shoes!), make sure you give your closet floor a good sweep or vacuum (if you’re feeling motivated why not aim for a squeakier clean with a little mop or carpet cleaning action!). Hit those baseboards, dust your closet light, try catch all those dust bunnies and cobwebs. If you have closet doors, wipe them down just as you did your walls, with a little soapy water or an all purpose cleaner and voila!
Time For A Rest!
You’re done! You’ve completed the first week of your 22-day Spring Cleaning Checklist, now pat yourself on the back, enjoy a few days off and get ready for next week’s assignments!