Cleaning Your Bathroom (And Quick!)
How To Clean Your Bathroom In 10 Minutes
Four easy steps, and very little effort.
We love cleaning—which is good, because we’ve built an entire plant-based cleaning line around it—and one of our favorite jobs is the bathroom. We know! A bit strange, but part of the reason we enjoy it, is we’ve got a system that makes the job go super fast– leaving you with a sparkling space in which to apply your makeup, lotions, perfumes and hair products.
Cleaning the bathroom may not be high on most people’s list of favorite chores, and it doesn’t really help to be told that doing it regularly is the easiest way to make short work of the job (though that is true!). But here’s some good news: With just two products, three tools, and a little strategy, you can get your bathroom clean in 10 minutes! That’s not much time at all, and the satisfaction of having a clean bathroom is well worth it.
Here’s how to make it happen.
STEP 1: Pick the right products and tools for the job.
The idea here is to streamline the number of products and tools you’re using, which will make you a faster cleaner because you won’t be forever reaching for another bottle or cleaning cloth.
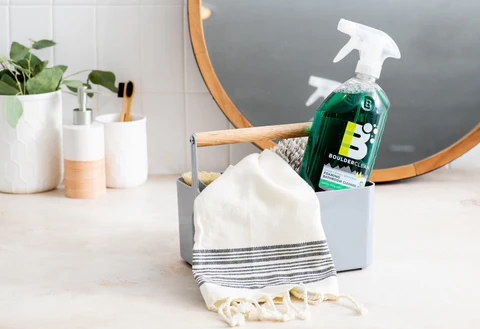
You only need two products to get your bathroom clean in less than 10 minutes, and with minimal scrubbing and scouring on your part:
The Foaming Bath is a cleaner that will cut through the kind of buildup that typically befouls a bathroom—toothpaste spittle, soap scum, residue from hairspray and dry shampoo—without a whole lot of scrubbing on your end. (The bubbles are meant to do the scrubbing!). The Glass + Surface Cleaner is clutch in a bathroom because it serves as both a glass and chrome cleaner, so you can use it to polish mirrors and faucets, and also as an all-purpose cleaner that can be safely used on countertop materials from corian and formica to granite and marble.
These products are designed to do most of the work for you, which means that you’ll only need these three tools to finish the job:
- Multi-Surface Scrubby Cloth
- A toilet brush
- Strong paper towels (or reusable microfiber wipes, like these from Casabella)
You can actually put down the toothbrush and squeegee and whatever other specialty cleaning tools you’ve collected over the years and do all of the cleaning using paper towels and a microfiber cloth. (Paper towels are truly best for glass cleaning, but reusable microfiber wipes will also work. The Casabella wipes are machine washable and can be used several times). And while you don’t technically need a toilet brush, you’ll probably want one for the obvious reason that using a toilet brush to scrub the toilet bowl definitely makes the job less disgusting.
STEP 2: Spray Foaming Bathroom Cleaner in your tub, sink, and toilet bowl.
Working in the right order will also save you a bunch of time. Start with the Foaming Bath, which is going to be your workhorse. Apply a thin layer of the foam cleaner to the tub, the sink basin and surrounding surface area, and the toilet bowl. Be sure to get the rim at the top of the bowl, where the water comes out when you flush, since this area can get particularly gross and mildewy. Once you’ve applied the Foaming Bath to the tub, sink, and toilet bowl, give the product three to five minutes to penetrate surface grime.

STEP 3: While the Foaming Bath does its thing, wipe down your mirror and exterior of your toilet with Glass + Surface Cleaner.
Spray a wad of paper towels or a microfiber wipe with the glass cleaner and start by polishing the mirror, and then use the same paper towels to clean the toilet. You’ll start by wiping the top of the tank, then work your way down. Pay extra attention to the flusher, since it’s one of the areas we touch the most. When you get to the seat, be sure to flip it and thoroughly clean the underside, spraying more surface cleaner there. With the seat still flipped up, wipe down the space between the bowl and the tank, where hair tends to collect. End by wiping the pedestal and floor area around the toilet.
By now, the toilet bowl has had plenty of time with the Foaming Bath, so all that’s left to do for your toilet is dip a brush in the toilet water and scrub the rim of the bowl. Then, flush the toilet and scrub the rest of the bowl, letting the brushing and the flushing water work in concert to scrub away bacteria and buildup.
STEP 4: Use a microfiber cloth to wipe the Foaming Bath off your sink and tub.
With the commode out of the way, it’s time to wipe the sink and tub down, which is where the microfiber comes in. The combination of microfiber and the foaming cleaner is going to make short work of blasting through soap scum and bacterial buildup: The foaming cleaner will penetrate and break down a lot of the mess before it’s even time to scrub it away, and the microfiber is designed to pick up more residue than cotton or terry cloth rags. Wet the microfiber cloth, and wipe away the foaming bathroom cleaner, switching to the scrubby side for especially stubborn patches of buildup, typically on the sides of the tub and around drains. Rinse the cloth frequently while you work, so that both the cloth and the water are working in tandem to wash away the foaming cleaner.
And you’re done!
Cleaning the bathroom may still never be your favorite chore—or maybe it will be now that you know the secret to being a bathroom cleaning maven! But hopefully the knowledge that 10 minutes, three products, three tools, and a little strategy is all you need to make it less horrible will encourage you to perform the task more regularly. After all, who doesn’t love a sparkling clean bathroom?!?